Crucial Adobe Illustrator Functions | Adobe Illustrator Tips

I’m going to show you the best tools for editing and making logos in adobe illustrator. These are the ones that I use for every single project. But not only am I going to show you the tools. But also a lot of them have handy hidden hacks. That will increase their power and your workflow.
The first tool or function that I often use for logo designing is the View Options functions. Now as you can see here I have a view dedicated to a specific part of my logo design. Now I can just click this view and snap to that point and work in detail. Something that is super powerful and useful when working on a logo design. Now setting up a view is very easy you just click View and then scroll down to new View.
The thing is let’s take the views to a new level. If you’ve seen some of these tools before or heard about them in a previous post. Stay tuned as you might actually learn something new about their tool. There is a specific way that I work on logos that is unique and pretty awesome. So head up to New Window and then click that option there. This will essentially open up the same document but in two different windows.
Then go ahead and arrange them so they are tiled. This is what I like to do in my workflow and I will zoom into a part of my design. So for example here is our custom view, and then on the other window. I have a kind of overall view of the design. But there is more, on that overall view I select everything and then press command or control + H and this will hide all of the anchor points. So I can clearly see what is going on. So now I can work both zoomed in and also zoomed out at the same time.
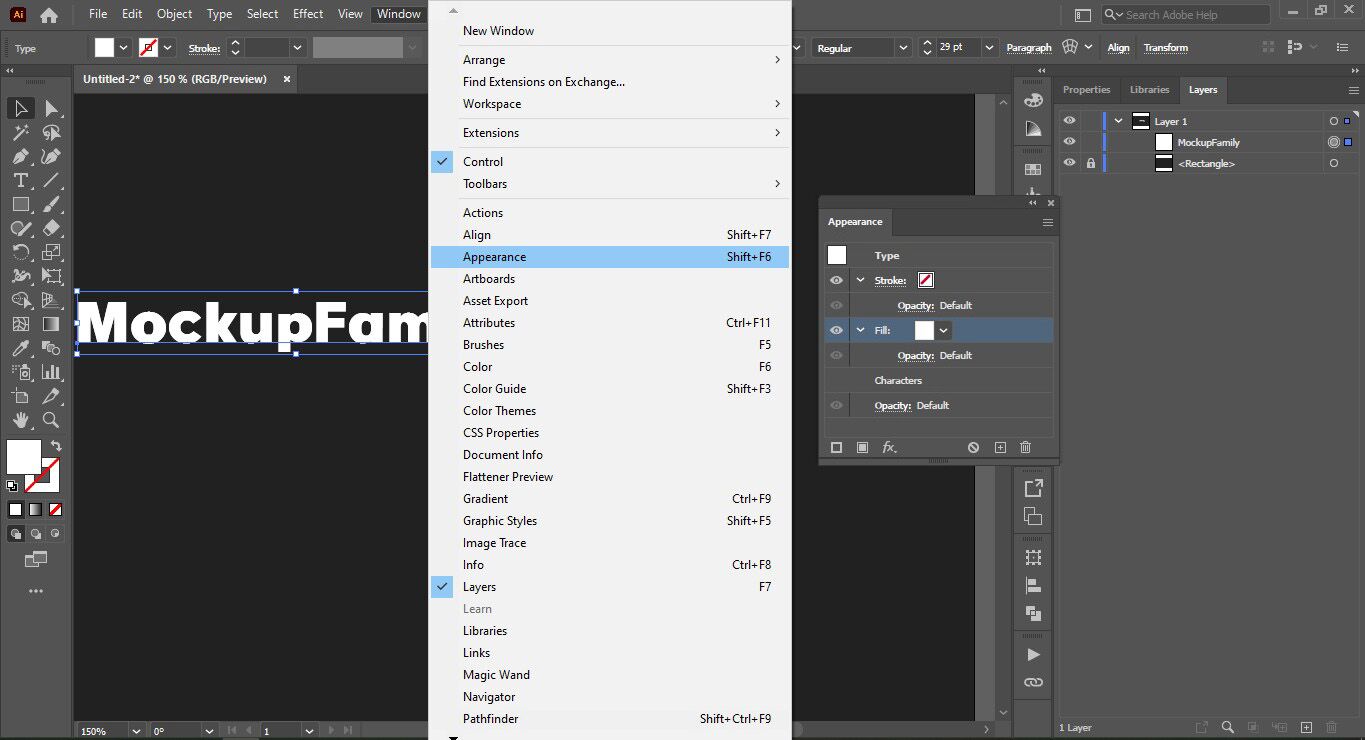
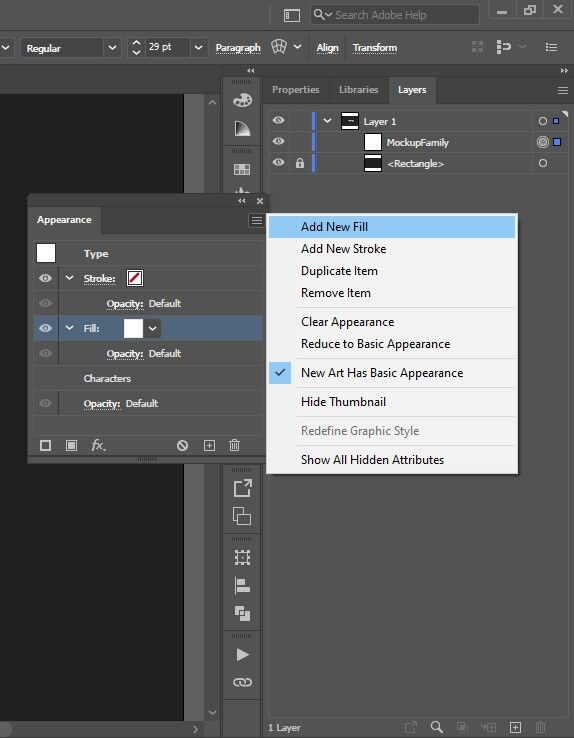
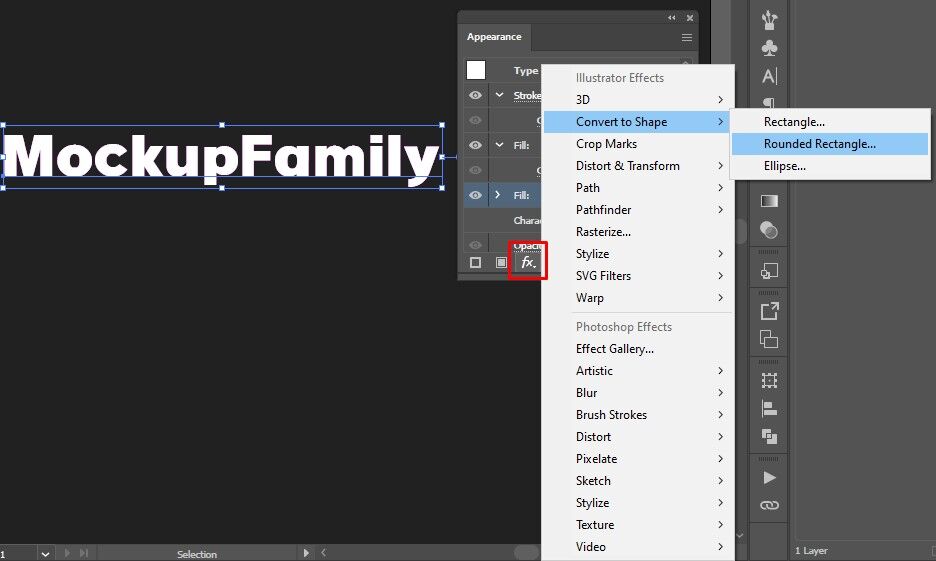
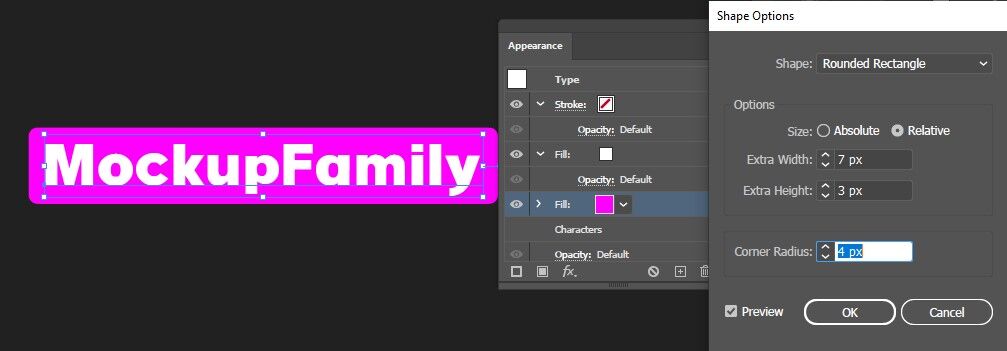
These functions demonstrate just how powerful of a program illustrator is. We can make responsive Labels or Buttons. And to do that first take some text and apply a color of your choice. You then need to open up the appearance panel. In the top right select, a New Fill and this will be our button. We need to apply an effect and that is to Convert to Rounded Rectangle.
In the new window, we simply adjust the roundness of the corners by nudging your arrow keys on your keyboard. And holding down shift kind of speeds that up by 10 times. We also can adjust the width and the height too. Now the responsive aspect of this design is that we can edit the text and the label or the button will change in accordance to our text. This typography is a pretty poor choice but yeah you get the idea.
Next up are some tips with Grids. Command or control and apostrophe will bring up the standard grid and also hide it. This can be useful when logo designing but I do prefer to make my own grids. So press M for the rectangle tool, hold down shift and make a square across your entire artboard covering it fully. Then split this stroke shape into a grid via this drop down menu here. In the new panel, you can apply your specifications and then just hit ok.
Ok cool but let’s take this even further and select everything right or control-click and then turn the entire thing into a guide. i then like to lock the guides down and if I don’t want to use them I will just hide them at some point. I personally prefer working with guides but each designer has their own preference. Now again this tip has an added bonus attached to it.
But first, it’s no secret that logo designers often are working on multiple artboards with variations of designs. Now if you want to save each of these designs as a separate document. You can check the save each artboard to separate file option. So I will then have three different ai files. However to help you with the organization when you make a new artboard like so. Make sure to give it a relevant name. Now if you give each artboard a different name when you save them separately each file is going to have a relevant name and thus you are going to remain more organized.
Another really important aspect of an illustrator that many of you know about is the Export Screens function as a logo designer, this is a huge huge time saver. You can set up all of your file formats and then control the scale of the size that you want to export. So I can have the same design at different scales say for example png, svg and so on it’s very very useful. Okay, so I have some file formats ready to go. But watch what happens when I select my entire design and then drop it into the screens option.
One of the ears has been allocated as a separate entity and that’s because it isn’t grouped with the logo mark itself. if you want everything to export as one single thing group it together with the command or control G. but it is also wise to export logotype separately too.
So how can we have a list of logo design tools without mentioning the Pathfinder. I’ve spoken about this thing so much on the site. We all should know by now that the hotkey for the compound paths is the alt or the option key when using the pathfinder function. This is a non-destructive workflow process. The pathfinder is so good for creating new shapes from other shapes and that’s something logo designers do all the time. An honorable mention also goes to the shape builder tool which I do use from time to time.
Then finally the appearance panel. Possibly one of the most powerful parts of an illustrator because you can do so much from one single vector path in this panel. And I’ve made an entire video on this tool about four years ago now. And if you want to take a look you can find that linked in the top right corner in the cards. But what you can take away from this post is that the appearance panel will save you a lot of time and it can work magic for logo designers. There’s not enough time in this post to get into that right now fully but these are the main tools that I use as a logo designer and how I use them.
Moving on to something in relation to compound paths. Firstly, a quick reminder that a compound path is where we have multiple different objects united as one vector path. It’s a non-destructive workflow and I can show that here with the circle that now has a crescent cut into it. But if we’re working on a specific kind of design we may want to be very precise with our adjustments. And I have some tips for that right here.
Firstly, hit command or control Y to enter into outline mode. And then we can take the group selection tool found right here. By holding down a click over the direct selection tool. Great, so this is pretty widely and commonly known. But if you click one of the shapes that you want to adjust and then hit R for the rotate tool. You can then hold down the alt or the option key and click your cyan crosshair that should bring up a rotate window.
Now we can make our precise adjustments of the compound path within adobe illustrator. This is essential for things like logo max or as some people might say logo symbols because we do need to keep a precise kind of workflow with those designs. Also, we can drag the crosshair into other areas of our compound path maybe as here in the direct center. Just like before press the alt or the option key and enter into the rotate mode. Remember this isn’t two shapes it’s a compound path which is non-destructive. We can also freehand move the inner cutout section by using the group selection tool as well as making a whole host of other adjustments too. But yeah the rotate tool can be used in this way to remain precise along with maybe the transform tools as well.


